[Inside Vue] 2. Initialize - Vue 코어 함수

이번 포스트에서는 Vue의 코어 함수를 찾고, Vue의 큰 구조에 대해 이야기 할 것입니다. Vue의 큰 구조를 이해하면, 코드를 분석 할 때, 자세히 봐야할 파일과 그렇지 않아도 되는 파일들을 구분 하는데 도움이 될 수 있습니다.
Vue 코어 살펴보기
1. Introduction - Vue Code 분석에
서 src/platforms/web/entry-runtime-with-compiler.js 파일이 import Vue from './runtime/index'로 Vue를 import 하는 것을 확인 했습니다. 이 것을 힌트로 src/platforms/web/runtime/index.js 파일을 시작으로 Vue 코어 코드를 살펴보도록 하겠습니다.
src/platforms/web/runtime/index.js 파일
src/platforms/web/runtime/index.js 파일에서 하는 일들을 살펴보도록 하겠습니다.
/* @flow */

import Vue from 'core/index'
import config from 'core/config'
import { extend, noop } from 'shared/util'
import { mountComponent } from 'core/instance/lifecycle'
import { devtools, inBrowser } from 'core/util/index'

import {
  query,
  mustUseProp,
  isReservedTag,
  isReservedAttr,
  getTagNamespace,
  isUnknownElement
} from 'web/util/index'

import { patch } from './patch'
import platformDirectives from './directives/index'
import platformComponents from './components/index'

// install platform specific utils
Vue.config.mustUseProp = mustUseProp
Vue.config.isReservedTag = isReservedTag
Vue.config.isReservedAttr = isReservedAttr
Vue.config.getTagNamespace = getTagNamespace
Vue.config.isUnknownElement = isUnknownElement

// install platform runtime directives & components
extend(Vue.options.directives, platformDirectives)
extend(Vue.options.components, platformComponents)

// install platform patch function
Vue.prototype.__patch__ = inBrowser ? patch : noop

// public mount method
Vue.prototype.$mount = function (
  el?: string | Element,
  hydrating?: boolean
): Component {
  el = el && inBrowser ? query(el) : undefined
  return mountComponent(this, el, hydrating)
}

// devtools global hook
/* istanbul ignore next */
if (inBrowser) {
  setTimeout(() => {
    if (config.devtools) {
      if (devtools) {
        devtools.emit('init', Vue)
      } else if (
        process.env.NODE_ENV !== 'production' &&
        process.env.NODE_ENV !== 'test'
      ) {
        console[console.info ? 'info' : 'log'](
          'Download the Vue Devtools extension for a better development experience:\n' +
          'https://github.com/vuejs/vue-devtools'
        )
      }
    }
    if (process.env.NODE_ENV !== 'production' &&
      process.env.NODE_ENV !== 'test' &&
      config.productionTip !== false &&
      typeof console !== 'undefined'
    ) {
      console[console.info ? 'info' : 'log'](
        `You are running Vue in development mode.\n` +
        `Make sure to turn on production mode when deploying for production.\n` +
        `See more tips at https://vuejs.org/guide/deployment.html`
      )
    }
  }, 0)
}

export default VueVue를 import 합니다.Vue를 또 다시 import 하는 것에 주목합시다.config를 import 합니다.- 유틸 함수들을 import 합니다.
patch,mountComponent를 import 합니다.patch와mountComponent함수는 view를 업데이트 하는 핵심부분입니다. 이번 포스트에서 언급했다는 것만 기억하고, 자세한 내용은 9. View Render - Patch에서 이야기 하도록 하겠습니다.platformDirectives(directive 들..),platformComponents(component 들..)을 import 합니다.- 특정한 플랫폼 유틸들을 install 합니다.(
// install platform specific utils주석으로 기록된 부분) - 플랫폼 directive와 component를 install 합니다.(
// install platform runtime directives & components주석으로 기록된 부분) patch함수를 install 합니다.(// install platform patch function주석으로 기록된 부분)patch함수가Vue.prototype.__patch__로 매칭되었다는 것만 기억합시다. 자세한 내용은 9. View Render - Patch에서 이야기 하도록 하겠습니다.mount메소드를 정의 합니다.(// public mount method주석으로 기록된 부분)- Vue Devtools와 개발 모드에서의 경고 메시지를
console.log로 출력 합니다.
코드를 통해 볼 수 있 듯이 이 파일은 Vue에 몇가지 플랫폼 동작들을 추가하는 일들을 합니다.
2가지 내용을 집중해야 합니다.
Vue.prototype.__patch__ = inBrowser ? patch : noop은 웹페이지를 업데이트 하는 역할을 합니다. 즉, DOM을 조작하는 역할을 합니다. 9. View Render - Patch에서 자세히 다루어 보도록 하겠습니다.Vue.prototype.$mount는mountComponent를 호출하는 역할을 합니다.$mount는 이전 포스트에서 몇가지 검증을 추가하여 캡슐화 된다고 이야기 했습니다. 이 파일에서 한번더 캡슐화 되어 2번 캡슐화 됩니다.mountComponent함수도 view를 업데이트 하는 핵심 함수입니다. 9. View Render - Patch에서 자세히 다루어 보도록 하겠습니다.
import Vue from 'core/index'에서 Vue 파일라고 정의 되어 있는 src/core/index.js 파일을 따라가 보도록 하겠습니다.
src/core/index.js 파일
import Vue from './instance/index'
import { initGlobalAPI } from './global-api/index'
import { isServerRendering } from 'core/util/env'
import { FunctionalRenderContext } from 'core/vdom/create-functional-component'

initGlobalAPI(Vue)

Object.defineProperty(Vue.prototype, '$isServer', {
  get: isServerRendering
})

Object.defineProperty(Vue.prototype, '$ssrContext', {
  get () {
    /* istanbul ignore next */
    return this.$vnode && this.$vnode.ssrContext
  }
})

// expose FunctionalRenderContext for ssr runtime helper installation
Object.defineProperty(Vue, 'FunctionalRenderContext', {
  value: FunctionalRenderContext
})

Vue.version = '__VERSION__'

export default Vue
이 파일에서는 전역 api들을 설정합니다. import Vue from './instance/index'를 보고 src/core/instance/index.js 파일을 따라가 보도록 하겠습니다.
src/core/instance/index.js 파일
import { initMixin } from './init'
import { stateMixin } from './state'
import { renderMixin } from './render'
import { eventsMixin } from './events'
import { lifecycleMixin } from './lifecycle'
import { warn } from '../util/index'

function Vue (options) {
  if (process.env.NODE_ENV !== 'production' &&
    !(this instanceof Vue)
  ) {
    warn('Vue is a constructor and should be called with the `new` keyword')
  }
  this._init(options)
}

initMixin(Vue)
stateMixin(Vue)
eventsMixin(Vue)
lifecycleMixin(Vue)
renderMixin(Vue)

export default Vue
function Vue (option) 드디어 찾던 Vue의 코어 함수입니다. Vue 코어 부분은 this._init만 호출하는 굉장히 짧은 코드입니다. src/core/instance/index.js에서 하는 일들을 살펴보도록 하겠습니다.
- 5개의 mixin을 import 합니다.
- Vue 인스턴스를 생성하는 함수를 정의 합니다.
- Vue에 5개의 mixin을 install 합니다.
Vue의 Layer
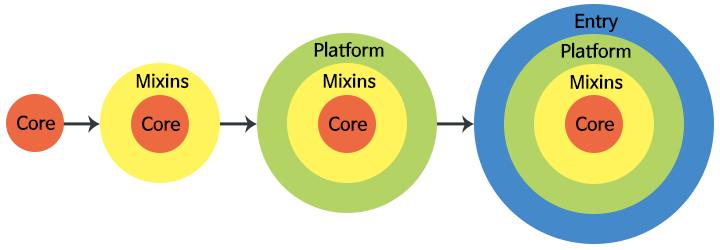
Vue는 큰 프로젝트입니다. 그래서 Vue는 많은 Layer와 part들로 나누어져 있습니다. Vue는 크게 4가지로 Layer로 구성됩니다.

- Core Layer: Vue 코어 함수입니다.
this._init()을 호출합니다.src/core/instance/index.js에서 살펴 볼 수 있습니다. - Mixins Layer: init, state, events, lifecycle, render, 5개의 mixin 함수를 Vue 코어에 추가 합니다.
src/core/instance/index.js에서 살펴 볼 수 있습니다. - Platform Layer: 몇가지 동작들을 Vue 코어에 추가합니다.
Vue.prototype.__patch__와Vue.prototype.$mount를 추가합니다.src/platforms/web/runtime/index.js에서 살펴 볼 수 있습니다. - Entry Layer: config와 캡슐화 된 $mount의 가장 바깥쪽
$mount를 Vue 코어에 추가합니다.src/platforms/web/entry-runtime-with-compiler.js에서 살펴 볼 수 있습니다.
이렇게 여러개의 layer로 구성한다면 몇가지 장점이 있습니다.
- 관심사를 분리 할 수 있습니다. 각각의 layer는 서로 다른 일들을 하게 됩니다.
- 캡슐화 할 수 있습니다. 각각의 layer는 각자의 일에만 집중하면 됩니다.
- 재사용 할 수 있습니다. 코어에 가까울수록 일반적(generic)을 코드가 됩니다. 이로 인해 다른 플랫폼에 쉽게 호환이 되고, 다른 환경에서 쉽게 구축할 수 있습니다.
요약
src/platforms/web/runtime/index.js를 시작으로 src/core/instance/index.js에 도달하여 Vue 코어 함수를 찾았습니다. src/core/instance/index.js 파일은 Vue 함수를 export 하게 되는데, export되는 Vue 함수는 5개의 mixin가 추가된 Vue 함수입니다. Vue 함수는 this_init 함수를 호출하여 초기화 합니다.
다음으로 볼 것
다음 포스트에서는 Core 함수에서 호출한 하는 5개의 mixin를 3. Initialize - Mixin Layer에서 좀 더 자세히 살펴 볼 것입니다.