[Inside Vue] 5. Reactive - Observer, Dep and Watcher


이번 포스트에서는 Observer와 Dep, Watcher에 대해 이야기 하도록 하겠습니다. Vue는 data가 변경되면, 자동으로 웹페이지를 업데이트 합니다. 이 때 감시자(옵저버) 패턴을 사용하는데, 옵저버 패턴에 관한 사전 지식이 있다면, 이해 하는데 도움이 될 것 같습니다.
이전 포스트(4. Initialize - _init 함수)에서는 Vue 인스턴스 생성시 초기화 하는 것에 대해 이야기 했습니다. 이번 포스트에서 이전 포스트에 관련된 이야기가 많이 등장하기 때문에, Vue 초기화 포스팅을 본 후 이번 포스팅을 보시는 것을 추천합니다.
Observer
src/core/observer/index.js 파일을 살펴보도록 하겠습니다. 이 파일에서 하는 주된 역할은 프로퍼티를 반응형 프로퍼티로 만드는 역할을 합니다.
defineReactive 함수
이전 포스트에서 defineReactive 함수를 많이 보셨을 것입니다. defineReactive 함수는 프로퍼티를 dep과 childOb(observe(val)의 리턴 값)를 가지는 반응형 프로퍼티로 만들어 줍니다.
/**
 * Define a reactive property on an Object.
 */
export function defineReactive (
  obj: Object,
  key: string,
  val: any,
  customSetter?: ?Function,
  shallow?: boolean
) {
  const dep = new Dep()

  ...

  let childOb = !shallow && observe(val)
  Object.defineProperty(obj, key, {
    ...
    get: function reactiveGetter () {
      const value = getter ? getter.call(obj) : val
      if (Dep.target) {
        dep.depend()
        if (childOb) {
          childOb.dep.depend()
          if (Array.isArray(value)) {
            dependArray(value)
          }
        }
      }
      return value
    },
    set: function reactiveSetter (newVal) {
      ...
      childOb = !shallow && observe(newVal)
      dep.notify()
    }
  })
}
defineReactive 함수 코드입니다. 중요한 코드만 남기도 나머지 코드는 생략하였습니다.
위의 코드에서 new Dep(), observe(), dependArray(), depend() notify()가 호출됩니다. 먼저 observe 함수를 살펴보도록 하겠습니다.
observe 함수
간단히 말하면 observe 함수는 Observer 인스턴스를 리턴하는 함수입니다.
/**
 * Attempt to create an observer instance for a value,
 * returns the new observer if successfully observed,
 * or the existing observer if the value already has one.
 */
export function observe (value: any, asRootData: ?boolean): Observer | void {
  if (!isObject(value) || value instanceof VNode) {
    return
  }
  let ob: Observer | void
  if (hasOwn(value, '__ob__') && value.__ob__ instanceof Observer) {
    ob = value.__ob__
  } else if (
    shouldObserve &&
    !isServerRendering() &&
    (Array.isArray(value) || isPlainObject(value)) &&
    Object.isExtensible(value) &&
    !value._isVue
  ) {
    ob = new Observer(value)
  }
  if (asRootData && ob) {
    ob.vmCount++
  }
  return ob
}
observe 함수는 이전 포스트(4. Initialize - _init 함수)의 initData 함수 안에서도 살펴보았습니다. observer 함수가 data 프로퍼티를 반응형으로 만드는 시작점입니다.
observe 함수는 존재하는 observer를 리턴하거나, observer를 생성(new Observer(value))하여 리턴합니다. 객체일 때만 observer 타입을 리턴 합니다. 원시 값(Number, String 등..)은 void 값을 리턴합니다.
value가 root data 일 경우 ob.vmCount++로 vmCount를 증가시켜 value를 root data로 하는 컴포넌트 갯수를 체크합니다.
dependArray 함수
dependArray 함수는 defineReactive 함수에서 정의한 get 함수에서 호출 되는 함수 입니다. dependArray 함수는 모든 배열 요소들에 depend() 호출 하도록 하는 함수입니다.
/**
 * Collect dependencies on array elements when the array is touched, since
 * we cannot intercept array element access like property getters.
 */
function dependArray (value: Array<any>) {
  for (let e, i = 0, l = value.length; i < l; i++) {
    e = value[i]
    e && e.__ob__ && e.__ob__.dep.depend()
    if (Array.isArray(e)) {
      dependArray(e)
    }
  }
}
배열을 반복하면서 e.__ob__.dep.depend()를 호출합니다.
Observer 클래스
observe 함수에서 리턴하는 Observer 인스턴스를 만드는 Observe 클래스를 살펴보도록 하겠습니다.
Observer 클래스는 객체를 반복문을 사용하여 각 요소에 defineReactive 함수를 호출하여 각각의 요소를 반응형 프로퍼티로 만드는 역할을 하는 클래스입니다.
/**
 * Observer class that is attached to each observed
 * object. Once attached, the observer converts the target
 * object's property keys into getter/setters that
 * collect dependencies and dispatch updates.
 */
export class Observer {
  value: any;
  dep: Dep;
  vmCount: number; // number of vms that have this object as root $data

  constructor (value: any) {
    this.value = value
    this.dep = new Dep()
    this.vmCount = 0
    def(value, '__ob__', this)
    if (Array.isArray(value)) {
      if (hasProto) {
        protoAugment(value, arrayMethods)
      } else {
        copyAugment(value, arrayMethods, arrayKeys)
      }
      this.observeArray(value)
    } else {
      this.walk(value)
    }
  }

  /**
   * Walk through all properties and convert them into
   * getter/setters. This method should only be called when
   * value type is Object.
   */
  walk (obj: Object) {
    const keys = Object.keys(obj)
    for (let i = 0; i < keys.length; i++) {
      defineReactive(obj, keys[i])
    }
  }

  /**
   * Observe a list of Array items.
   */
  observeArray (items: Array<any>) {
    for (let i = 0, l = items.length; i < l; i++) {
      observe(items[i])
    }
  }
}this.value, this.dep, this.vmCount를 초기화와 __ob__ 프로퍼티를 정의합니다.
value가 배열 일 경우, array 메소드(push, pop과 같은..)를 중간에 가로체 재정의 합니다. 이유는 Vue가 array 메소드를 호출했을때 알아차리기 위해서 입니다. 그 후 observeArray 함수를 호출합니다. observeArray 함수는 반복문을 통해 observe 함수를 실행하여 각 요소들을 반응형 프로퍼티로 만들어 줍니다.
배열이 아닌 경우 this.walk 함수를 실행합니다. 이 함수는 객체에 각 요소마다 defineReactive를 호출하여 각 요소를 반응형 프로퍼티로 만들어줍니다.
defineReactive 함수에서 시작해서 Observer 클래스까지 코드 호출 순서를 보면,
defineReactive()호출observe()호출new Observe(value)호출this.walk()호출defineReactive()호출
defineReactive 함수 호출로 시작하여 defineReactive 함수를 호출합니다. 이렇게 재귀적으로 defineReactive 함수를 호출하여 모든 하위 요소들을 반응형 프로퍼티로 변환하게 됩니다.
이렇게 객체의 모든 하위 요소를 반응형 프로퍼티로 변환하는 이유는,
data: {
  name: 'foo',
  parents: {
    mom: 'foomom',
    dad: 'foodad'
  }
}
위의 코드와 같이 data라는 객체가 있을 때, data.name의 값이나 data.parents.mom의 값이 변경 되었을 때, data의 setter 함수는 호출 되지 습니다. setter 함수가 호출되지 않으면 notify가 호출되지 않아 view가 업데이트 되지 않습니다.
재귀적으로 defineReactive 함수를 호출하면, 모든 하위 요소를 반응형 프로퍼티로 변환되어 data.name이나 data.parents.mom의 값이 변경 되어도 자동으로 view를 업데이트 할 수 있게 됩니다.
Dep
src/core/observer/dep.js 파일을 살펴보도록 하겠습니다. 이 파일에서 하는 주된 역할은 Watcher를 관리하는 역할을 합니다.
Dep 클래스
Dep 클래스의 상단 주석을 보면
A dep is an observable that can have multiple directives subscribing to it.
라고 기록되어 있습니다. Dep는 여러개의 지시문(directives)을 구독(subscribe) 할 수 있는 관찰 가능한 객체입니다. 옵저버 패턴 wiki를 보고 비교하자면, Dep은 옵저버들의 목록을 객체에 등록하여 관리하는 역할을 하는 것으로 보입니다.
/**
 * A dep is an observable that can have multiple
 * directives subscribing to it.
 */
export default class Dep {
  static target: ?Watcher;
  id: number;
  subs: Array<Watcher>;

  constructor () {
    this.id = uid++
    this.subs = []
  }

  addSub (sub: Watcher) {
    this.subs.push(sub)
  }

  removeSub (sub: Watcher) {
    remove(this.subs, sub)
  }

  depend () {
    if (Dep.target) {
      Dep.target.addDep(this)
    }
  }

  notify () {
    // stabilize the subscriber list first
    const subs = this.subs.slice()
    if (process.env.NODE_ENV !== 'production' && !config.async) {
      // subs aren't sorted in scheduler if not running async
      // we need to sort them now to make sure they fire in correct
      // order
      subs.sort((a, b) => a.id - b.id)
    }
    for (let i = 0, l = subs.length; i < l; i++) {
      subs[i].update()
    }
  }
}
Dep 클래스는 addSub, removeSub, depend, notify 4개의 메소드로 구성된 클래스입니다.
addSub, removeSub, notify는 this.subs(Watcher 배열)을 다루는 메소드입니다. Dep 인스턴스는 Watcher들을 저장하고 있는 배열을 가지고 있습니다.
addSub, removeSub 함수
this.subs 배열에 Watcher를 추가/제거하는 함수입니다.
notify 함수
notify가 호출되면 배열에 있는 모든 Watcher의 update 함수가 실행됩니다. notify 함수는 defineReactive 함수에서 정의한 setter 함수에서 호출됩니다. 즉 반응형 프로퍼티가 변경이 되면 그 프로퍼티를 감시하고 있는 모든 Watcher들의 update 함수가 호출됩니다.
depend 함수
depend 함수는 Dep.target을 확인하고 없다면 Dep.target.addDep(this)를 실행합니다.
addDep 함수는 Watcher 클래스에 정의되어 있습니다. addDep라는 함수 이름에서 Watcher 클래스가 Dep 배열을 가지고 있다는 것을 추측해 볼 수 있겠죠?
Dep.target 객체
// The current target watcher being evaluated.
// This is globally unique because only one watcher
// can be evaluated at a time.
Dep.target = null
주석을 보면 Dep.target 객체는 현재 평가되고 있는 Watcher라고 기록되어 있습니다. 평가된다 라는 말은 새로운 값을 가져온다라고 이해하시면 될 것 같습니다. Dep.target은 Watcher는 동시에 하나만 평가할 수 있기 때문에 전역으로 유니크하다고 합니다.
pushTarget, popTarget 함수
const targetStack = []

export function pushTarget (target: ?Watcher) {
  targetStack.push(target)
  Dep.target = target
}

export function popTarget () {
  targetStack.pop()
  Dep.target = targetStack[targetStack.length - 1]
}pushTarget, popTarget 함수는 Watcher 클래스에서 호출되는 함수입니다.
두 함수를 쉽게 이해하자면, 한 Watcher가 평가 도중에 다른 Watcher의 값을 가져와야 할 때 사용되거나, 다시 원래의 Watcher로 돌아갈 때 사용됩니다.
Watcher
src/core/observer/watcher.js 파일을 살펴보도록 하겠습니다.
Watcher 클래스
Watcher 클래스의 코드는 좀 양이 많습니다. 클래스 상단의 주석을 통해 Watcher 클래스의 역할을 살펴볼 수 있습니다.
A watcher parses an expression, collects dependencies, and fires callback when the expression value changes. This is used for both the $watch() api and directives.
Watcher 클래스는 expression(생성자를 통해 expOrFn 이름으로 전달 받습니다.)을 파싱하고, 종속성을 모으고, expression 값이 변경 될 때, 콜백함수를 실행합니다.
$watch()(3. Initialize - Mixin Layer에서 살펴본 stateMixin 함수에서 정의합니다.)와 initComputed(4. Initialize - _init 함수에서 살펴보았습니다.)에서 Watcher 인스턴스를 생성합니다.
constructor 함수
constructor (
  vm: Component,
  expOrFn: string | Function,
  cb: Function,
  options?: ?Object,
  isRenderWatcher?: boolean
) {
  this.vm = vm
  if (isRenderWatcher) {
    vm._watcher = this
  }
  vm._watchers.push(this)
  // options
  if (options) {
    this.deep = !!options.deep
    this.user = !!options.user
    this.lazy = !!options.lazy
    this.sync = !!options.sync
    this.before = options.before
  } else {
    this.deep = this.user = this.lazy = this.sync = false
  }
  this.cb = cb
  this.id = ++uid // uid for batching
  this.active = true
  this.dirty = this.lazy // for lazy watchers
  this.deps = []
  this.newDeps = []
  this.depIds = new Set()
  this.newDepIds = new Set()
  this.expression = process.env.NODE_ENV !== 'production'
    ? expOrFn.toString()
    : ''
  // parse expression for getter
  if (typeof expOrFn === 'function') {
    this.getter = expOrFn
  } else {
    this.getter = parsePath(expOrFn)
    if (!this.getter) {
      this.getter = noop
      process.env.NODE_ENV !== 'production' && warn(
        `Failed watching path: "${expOrFn}" ` +
        'Watcher only accepts simple dot-delimited paths. ' +
        'For full control, use a function instead.',
        vm
      )
    }
  }
  this.value = this.lazy
    ? undefined
    : this.get()
}
위의 코드는 Watcher 클래스의 constructor(생성자) 함수입니다. 생성자 함수에서는 몇가지 변수들의 초기화와 computed 함수 또는 watach 표현식을 (expOrFn에 전달된 값들) this.getter에 저장합니다. 그리고 마지막으로 this.lazy가 아닐 경우 this.get()을 호출합니다.
this.lazy는 6. Reactive - Watcher가 업데이트 하는 3가지 방법(Lazy, Sync, Queue)에서 자세히 살펴보도록 하겠습니다.
get 함수
/**
  * Evaluate the getter, and re-collect dependencies.
  */
get () {
  pushTarget(this)
  let value
  const vm = this.vm
  try {
    value = this.getter.call(vm, vm)
  } catch (e) {
    if (this.user) {
      handleError(e, vm, `getter for watcher "${this.expression}"`)
    } else {
      throw e
    }
  } finally {
    // "touch" every property so they are all tracked as
    // dependencies for deep watching
    if (this.deep) {
      traverse(value)
    }
    popTarget()
    this.cleanupDeps()
  }
  return value
}
get 함수에서 pushTarget와 popTarget 함수를 볼 수 있습니다. 이 두 함수는 src/core/observer/dep.js에 정의되어 있는 함수 입니다. 현재 평가 중인 Watcher를 설정하는 함수 입니다.
Watcher 동작 순서
{
  data: {
    name: 'foo'
  },
  computed: {
    newName () {
      return this.name + 'new!'
    }
  }
}
위의 코드와 같이 Vue 옵션을 정의했다고 가정합시다.
Vue함수this._init()실행 (initMixin함수에Vue.prototype._init함수임)initState(vm)실행initState함수에서initData(vm)실행proxy(vm, '_data', key)실행observe(data, true /* asRootData */)실행
위의 순서로 data 는 반응형 프로퍼티로 변환됩니다. proxy 함수로 인해 this.name은 this._data['name']으로 프록시 됩니다.
이제 본격적으로 Watcher 클래스의 동작 순서를 이야기 해 보겠습니다.
Vue함수 ->this._init->initState->initComputed->new Watcher(...)순서로Watcher인스턴스가 생성됩니다.- 생성자 함수에서
this.get()를 호출합니다. get함수에서pushTarget(this)를 호출하여Dep.target를 현재 watcher로 변경합니다.get함수에서this.getter.call(vm, vm)를 호출합니다.this.getter는initComputed함수에서Watcher인스턴스를 생성 할 때 전달 받은getter입니다. 즉,this.getter는computed속성에 정의된 함수입니다.위의 코드는const userDef = computed[key] const getter = typeof userDef === 'function' ? userDef : userDef.get ... if (!isSSR) { // create internal watcher for the computed property. watchers[key] = new Watcher( vm, getter || noop, noop, computedWatcherOptions ) }initComputed함수에서Watcher인스턴스를 생성하는 코드입니다.this.getter.call(vm, vm)는 결국return this.name + 'new!'를 호출한 것과 같습니다.this.name은this._data['name']이 프록시 된 값입니다. 반응형 프로퍼티인this._data['name']의 getter(defineReactive함수의 get 함수)가 실행됩니다.defineReactive함수에서 정의한 get 함수에서dep.depend()를 호출합니다.Dep클래스의depend함수에서Dep.target.addDep(this)를 호출합니다. 여기서this는defineReactive함수에서 정의 한dep(const dep = new Dep())입니다.defineReactive를 호출한 주체는_data이기 때문에,dep은_data의dep입니다.defineReactive함수에서 정의한 get 함수에서childOb.dep.depend()를 호출합니다.Dep.target.addDep(this)를 호출하는데,this는childOb.__ob__.dep입니다.Watcher클래스의addDep함수에서this.newDepIds와this.newDeps에 각각dep.id와dep을 저장합니다.Watcher클래스의addDep함수에서this.depIds의 기본 값은 빈 배열([])이기 때문에dep.addSub(this)를 호출하게 됩니다.Dep클래스의addSub는this.subs에 현재 Watcher를 등록하는 역할을 합니다.- 6 ~ 13번을 거쳐
Watcher클래스의get함수의value에 값이 세팅됩니다. Watcher클래스의get함수에서traverse(value)를 호출합니다.Watcher클래스의get함수에서popTarget()를 호출합니다.Watcher클래스의get함수에서this.cleanupDeps()를 호출합니다.cleanupDeps함수는 종속성을 업데이트 하는 역할을 합니다.
위의 과정을 거치면서 Watcher는 종속성(Dep)을 알게 되고, Dep는 구독자(subscriber)들을 알게 됩니다. 쉽게 말에 위의 과정을 통해 Watcher와 Dep과 Observer가 관계를 형성합니다. 이 관계를 통해 Vue는 반응형으로 동작하게 됩니다.
반응형 프로퍼티들이 새로운 값으로 변경되면, Dep의 notify 함수가 호출되어 구독자들의 get 함수가 호출되고, 값과 관계(Watcher와 Dep과 Observer의 관계)들이 업데이트 됩니다.
요약
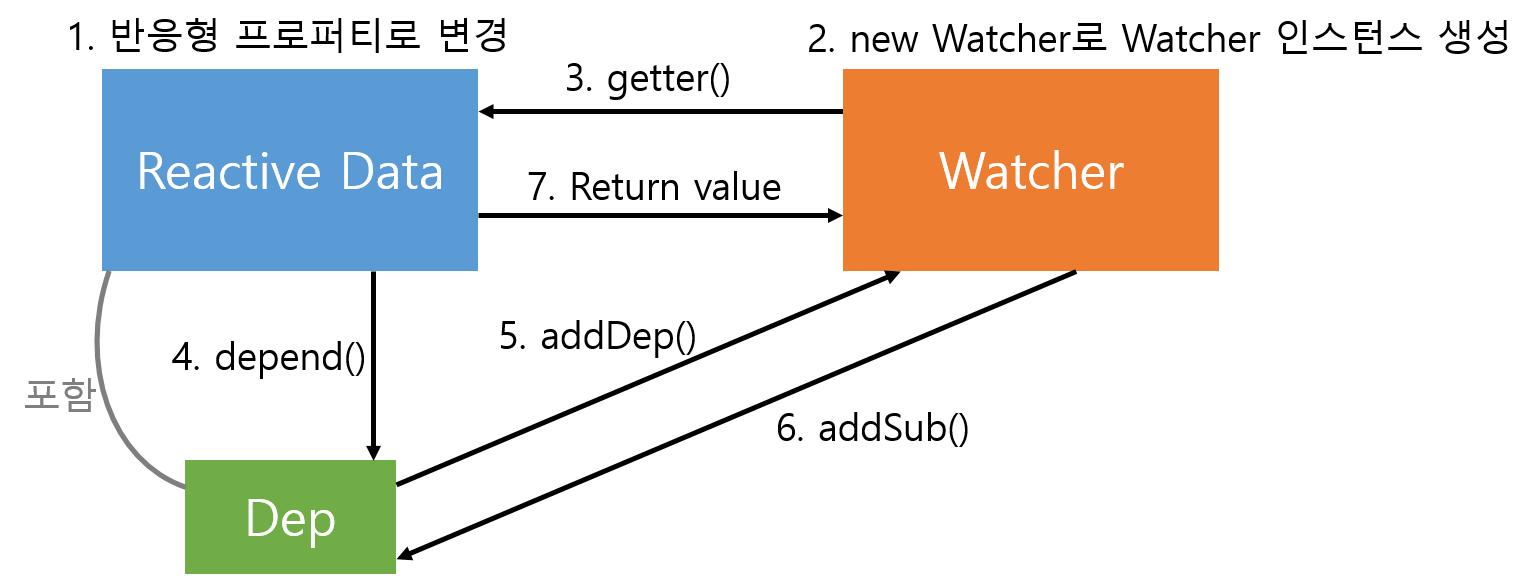
위의 그림은 이번 포스트에서 이야기한 Dep와 Watcher, Observer 간의 관계를 이해하는데 도움이 될 수 있는 순서도 입니다. 반응형 프로퍼티가 수정이 되면, 위의 그림의 순서를 따라 동작하고, computed 속성과 관계를 업데이트 합니다.
다음으로 볼 것
다음 포스트에서는 6. Reactive - Watcher가 업데이트 하는 3가지 방법(Lazy, Sync, Queue)에 대해 이야기 하도록 하겠습니다.